Friday, 1 July 2016

Unit 48-Brief 4-Mixing and Mastering


The process I undertook to complete the mastering and mixing of the track Sam Smith - 'Stay with me'


When I completed the song I created an audio mix down to an MP3 file which I then uploaded to a new cuebase project.  This allowed me to add effects to the overall song and not separate tracks.  The first thing that I did was to add a multi-band compressor which balanced out the sound by separating the wave forms which I could then compress separately.  What the Compressor does is it compresses the sound waves, smaller or bigger to how loud and precise you want the sound waves to sound.  When I was completing this I wanted to compress the bass of the track down as it was very distorted and overpowering the track.  This gave the whole song the balance that was needed.  I then upped the vocals because they were very quiet compared to the other tracks which yet again balanced the whole track making it sound more professional.  When mixing the track I set the gain to an appropriate level so that it wasn't too distorted or over dubbed and I used a high and low EQ to equalise the whole song making sure it was in stereo and that the quality was high.  Before doing the audio mix down and putting the whole song on the project I added reverb on the vocals to give it a sharper gloomy effect which suited the original song.  I used gates which allowed me to pan out the sound to the left and right ear.  This gave it a nice surround sound effect.  I used all these effects through effects channels which I used on the separate tracks first then I created an audio mix down and a new project which I compressed the whole track to.  I made sure that the mix was close to zero decibels to ensure that it didn't damage the listeners ear and to enable it to be listened on different devices such as headphones and speakers.   At the end of the process of mastering and mixing, I completed an audio mix down formatting it in an MP3 file so that it was compatible for all devices and to enable me to distribute it online.  Because I recorded most of the tracks live and not through direct input I had to make sure that there was no background noises and that each track was to a professional standard being at it's best quality to be listened to. Also on the vocals I used a slight delay effect to add emotion and quality to the track.

Unit 49 -brief 2-Sequencing

https://Soundcloud.com/brandon-moss-course-work/unit-49-brief-2


What is Midi? -MIDI (Musical Instrument Digital Interface) is a protocol developed in the 1980's which allows electronic instruments and other digital musical tools to communicate with each other.  MIDI itself does not make sound, it is just a series of messages like "note on," "note off," "note/pitch," "pitchbend," and many more.  These messages are interpreted by a MIDI instrument to produce sound.  A MIDI instrument can be a piece of hardware (electronic keyboard, synthesizer) or part of a software environment (ableton, garageband, digital performer, logic...).
The advantages of MIDI include:
compact -an entire song can be stored within a few hundred MIDI messages (compared to audio data which is sampled thousands of times a second)
easy to modify/manipulate notes -change pitch, duration, and other parameters without having to rerecord
change instruments -remember, MIDI only describes which notes to play, you can send these notes to any instrument to change the overall sound of the composition.

Midi Hard ware 


I have used a midi keyboard to record all of the tracks and I have used midi to input the notes from the song that i chosen which was La La La by Naughty Boy.


What is DAW -A digital audio workstation (DAW) is a computer that is specially equipped with a high-quality sound card and programming for editing and processing digital audio at a professional level. Digital audio workstations can range from a simple two-channel editor to a complete digital recording studio suite.


Hallion Sonic SE/Sylenth for software synthesisers- I used both of these software synthesisers when inputting the notes both of these synths aloud me to manipulate and control the sound wave and add on effects.On Sylenth i can change the wave form for example i can change it from saw tooth to a square wave this helped me find the correct sound that i was looking for and pitches.


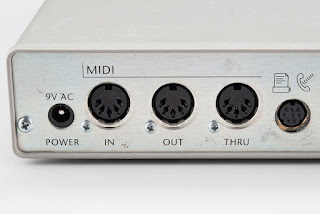
Midi Interfaces -MIDI interface is a device that can accept MIDI plugs (the old fashioned hardware type) and send and receive MIDI signal. MIDI stands for 'Musical Instrument DigitalInterface' and is a protocol, or an agreed standard adopted to ensure certain ground rules are met when software and hardware are designed.For this project i used the keystudio 49i.


Here is a photo of my track list of all the different instruments I used through Midi and Synths as i inputed the notes from the song.


Unit 49-brief 4-Composing

https://soundcloud.com/brandon-moss-course-work/vibes-mastered


Composition Technique


Structure -  The structure in my project I used is an ongoing build up of a house style genre beat which starts with a fall to the floor pattern which is repeated then followed by synths and drum samples.  Eventually, these slow down after the main chorus and the base drum is removed and you are only left with a synth and high hat pattern which slowly transitions out to end the song.

Genre - The genre of my project is a house / trance stylistic.

Statement -  The main hook and riff is the melody of the synth which is brought in gradually from a quarter way in.  This lasts until the end of the song.

Repetition - What I have repeated in the project is the fall to the floor pattern and main melody from the synth.

Difference - The difference in the track is that the melody gradually comes in and towards the end of the track another synth is layered on top to create a transition to end the song.  The fall to the floor of the bass drum is removed in the last couple of bars.


Composers rights -  As a composer I will need to get rights of the tracks so that I get full claim if anyone tries to copyright it and call it there own.  I would need to get grants and patents for the song I have created to protect me as a composer.


Sound Design


Waveform structures - In one of my synths I use a sylenth track which allowed me to manipulate the different waveform structures.  Eg.  I could change it to a square wave or saw tooth wave to create the sound that I was looking for.  

Waveform editing techniques -  In the sylenth track, I could add delays, distortion and compress the track to suit my style and the sound that I was trying to create.  


Availability 

Software inputs -  I used 3 sylenth tracks and 1 Hallion tracks.  The reason for using the sylenth tracks is to enable me to manipulate the sound in much greater detail. I used Hallion to get the electrical drum kit sound which I did not want to manipulate in great detail.

Analogue and digital inputs - I used a digital input from a midi keyboard controller and I used the sound cards embedded in the cuebase software and the add on content such as sylenth which allowed me to manipulate sound.  

Editing sources - The editing sources I used was the sylenth layout and various compressors such as multi band compressor and other effects such as side chaining. 

Sound libraries - I used the sound library which was media bay to find the sound of the high hat which I then put onto a sample pad to create my high hat beat. 

Playback equipment - To keep listening to the track again I used headphones to listen in great detail to the track and I used the looping and replay button through the cuebase software. 

File transfer - The midi is transferred through a USB connector which plugs directly into the computer. I downloaded the files and transferred them to the desktop.

Copyright issues - I will need to make sure that I do not use anyones music or piece of work and stick to my own original composition and if I would use small samples I would need to make sure that I had rights from the composers who created them. 


Mixing / Mastering 


Mastering 2CD - To master is to a CD, you highlight the selection of the track that you want to convert and complete an audio mix down.  You select the cd that you are going to burn it to and choose the format that you would like the track in. 

Formats and compatibility - The chosen format was to put it into an MP3 file so that it is compatible with windows and Mac Computers.  This also enabled me to distribute it on line. 

Loudness - When mastering the track, listening through my headphones and speakers, I would make sure that each of the tracks were at the correct sound level so that it didn't become too distorted or too loud so that it didn't damage the consumer's ear.  I would need to make sure that the sound wouldn't reach over 120 decibels. 

Internet distribution - I would need to make sure that the track was in the correct format, MP3, so that I could distribute my track on the internet through sites such as soundcloud where it can be consumed worldwide and online. 

Compression - When mastering the track, I used a multi band compressor to compress each section of the track to make sure it was a balanced sound and to ensure that each part was not too loud or distorted.  If it was I would compress the different sound waves making them smaller or bigger to get the correct sound that I am looking for. 

Equalisation - In order that I may achieve the best quality sound, I will need to make sure that I have used the correct EQ and gain to make sure that the track is not over distorted or low quality.

Sonic problems - Anything could go wrong using digital technology such as the computer crashing or losing the files.  So to avoid this I will need to make sure that I have a back up file just in case I lose content. 

Unit 49-brief 3-Creative arrangement

https://soundcloud.com/brandon-moss-course-work/unit-49-brief-3-creative-arrangement


The piece I have chosen is Seven Nation Army with the house style genre.I will re structure and remake the song so it is a house track but i will keep some of the main melodies making the song a remix.

House Music

  • Typical house music instruments-  in the new latest generation of house alot of electrical instruments are used.  Such as : symphosizers and midi controllers with sound cards and used on musical softwares. In the early stages of house artists such as Nile Rogers used a range of acoustic instruments.  Such as, guitar, drums and keyboards.  But now most of these instruments are electronic.  For example drum machines which create the future house sound. 
  • Bpm- A typical BPM for a house track is 120bpm and higher.  But there is also slower house which is a much lower bpm.  
  • Styles- There are many styles of house.  The creation of house links in and splits into many genres, such as, dance and trance which are all similar to the house style but have there own spin on it .
  • Examples of artists- There is a wide range of artists. One of the starters and creators of house, was Nile Rogers.  But the more up to date artists are David Guetta and Calvin Harris who are also DJs themselves. 

Music Features 

  • Texture and structure- In the structure of a house track there is a main beat and rhythm which is fall to the floor which is a base drum pattern repeated throughout at a fast pace.  Also in the structure of a house track there is a syncopated high hat beat which can be from a closed and open high hat but is from an electrical drum kit or drum machine.  There is the main verse followed by a drop which drops into the main chorus of the song.  This uplifts the track and give it it's own unique structure.  The texture of a house track is a constant beat that builds up into a drop going into the main chorus which is mostly a fast paced tempo.  This is one of the main reasons that house tracks are played at clubs because they uplift crowds. 
  • Effects- Many effects are used in House.  Such as delays in the vocals, samples of the vocals and beats, side chaining tracks together so that they are syncopated and transitions and multi band compressors to compress the sounds to manipulate it in a different way.  There are also pitch convertors which change the pitch of the vocals and certain parts of the song.  
  • Rhythm/Tempo - the main structure of the rhythm and tempo is a gradually building beat that gets faster throughout the drop and main chorus that gently calms down before the next drop.  

Track List 


My track list consists of a variety of symphs and drum machines which all come together to structure my song.  At the start of my song with the first tracks is a fall to the floor base drum sound which is followed by a base line melody from one of the symphasizers which is then built up with other symphs which are layered on top to give it a better variety of sound and they are added on to build the track until the drop when the drop includes a variety of symphasizers layered together on top of each other to create a strong and powerful base and thick textured sound which then calms down into another verse which is then built up again up to a drop which is then left on a cliff hanger and then the track ends as the second drop is about to begin. 


Evaluation 

The successes of this project is that I was able to re-mix this song 'Seven Nation Army' and remake it into the house style by keeping it's main well known features which I have manipulated.  My project stays in the conventions of the house music genre by having similar structures and textures such as: fall to the floor beats and it also has many effects such as side chaining. 

Thursday, 30 June 2016

Unit 49 Brief 1- setting up audio equipment


Steps taken:

First you Take the boxes apart then keeps lids away for safety.Then
Keep the mixing desk on power supply, move the desk to position and lock wheels for safety.
You now move base bins to position, add pillars set up main speakers on top, about the same height
and Ensure everything is secured tightly.Connect the speaker cables to power supply and Make sure everything is taped and out of way.Then connect desk to the amps with jack leads (balanced) plug to mains and Flat line desk otherwise you will get bad noises.Add the XLR cables for the microphone and turn on desk first, check desk.After this turn on the speakers and for the final stage complete level testing.


Risk assessment-

Exposed to live wire- Live wire can be dangerous when turned on, if turned on and touched, electrical shocks may occur.
Plug socket- This will need to be away from children and food and water to reduce electrical risks
Broken cables- These can cause electrical hazards and cause people to trip.
Water near electric- Water and food need to be away from electrical equipment at all times so that there are no electrical hazards such as electric shocks which can be fatal.
Physical risk/lift with knees- When setting up the equipment, ensure you have people with you to avoid back pains and avoid injury by dropping equipment on yourself. When picking up heavy items and lifting you should bend with your knees to give you more balance and stability.
Tripping over wires/tape up wires- If the wires are not out of the way and not safely taped up they can be a hazard and cause people to fall over and injure themselves. To avoid this tape down the wires, this will reduce the risk of tripping over them.
Keep lids out the way- When taking off the lids at the start ensure they are away at all times except for packing up to avoid tripping up and them being in your way.
Things falling over/safe handling/storage- Make sure that things are stacked correctly such as the mixing desk on the wheels and ensure all the wires are tucked behind.
Leave it as found- When packing the equipment up it should be packed away exactly as you found it to avoid things getting lost and causing inconveniences to others.
Noise levels/120dB- When handling noise levels ensure it does not reach over 120 decibells so it does not cause harm to people's hearing. Failure to do this will result in ear damage. \
Mic behind speakers/feedback- ensure the mic is behind the speakers so no unnecessary sound occurs and the feedback is clear.


Unit 48 Brief 4- Mixing and Mastering

Mixing-


Mastering-

Monday, 20 June 2016

Unit 48 Brief 3- Recording a pop song

Unit 48- Brief 3
Sam Smith


  • Pre-recording


Run-through-


Before recording any tracks we went for a run through. This was an important process to complete because it made sure that all of the musicians and artists knew exactly what to do during the recording and to get the correct sound level. For the recording of the pop song, I made sure each musician did many run throughs and takes before the final recording. This helped them identify the components and techniques needed in order to achieve the sound and material I was looking for.


Rehearsal-


Rehearsal was a major process that needed to be undertaken so that the track turned out exactly to what I had planned. This process allowed the artists and musicians to practice each of their pieces and refine their material so when it came to recording in the sessions, they knew exactly what to play. Rehearsals also allowed me as a recording engineer to direct what exactly I was looking for from each of the artists and what sound I was trying to achieve. 


Level and Sound checks- 


Before undertaking recordings one of the most important parts of the recording process is that you undertake level and sound checks. This needs to be done to ensure you achieve a high quality of sound, to make sure everything is working correctly and to balance out the level of track you want compared to other tracks. 


Gain-


The gain level must be set for recording and should be undertaken during level and sound checks. This is to make sure the gain level is set to the accurate rate so the sound waves do not sound distorted or of a low quality. 


Stereo recording-


When recording the guitar and piano of this track, I used a method of stereo recording which is where I used two microphones and positioned them right and left side of the instrument to achieve a stereo sound picking up two different sound tracks from the left and right of the instrument creating a higher quality sound. 


Track lists-


This had to be completed before recording. This was a sheet of all the instruments I needed for the song and what equipment they would need.  It would consist of:


  • Piano- condenser 
  • Acoustic Guitar- condenser
  • Vocals- dynamic microphone
  • Bass Guitar- DI

Multi-track recording-


I used multiple tracks for recording each instrument so that I could individually manipulate each instrument to get the correct balance and sound and to record them on their own.


Screen/guards/pop shields- 


When recording vocals, I used a pop shield and a screen guard to get rid of any unwanted sounds and to get a clear vocal recording. 


  • Electronic Instruments -


Direct injection/bass- 


Direct injection or direct input (DI) is what I used when recording the bass guitar , this allowed me to plug the jack lead from the guitar into the DI box to get a direct sound from the bass guitar instead of using a microphone. This helped me create an accurate sound of the bass guitar without any background noise. 


  • Recording-

Talk back-

The talk back system was used when undergoing the process of recordings. This allowed me to talk from the recording studio into the recording booth. This is used through a button on the mixing desk allowing me to communicate with the artists or musicians in session but this needs to be turned off during recordings to avoid any conversation being engaged during the sessions.

Headphones-

 I gave headphones to the musicians and artists when recording so they could listen to the click track or the other parts of the song so they could follow the structure and the tempo of the track.

Monitors/levels-

To hear the sound of what was being recorded in the recording room we had stereo monitors so we could listen to what was being recorded so that I could make sure everything was going to plan and it represented the sound that I wanted. To get the correct sound levels I used a mixing desk to change the gain and other levels and I also used multi-band compressors to compress the sound and add effects.

Track sheets/identifying tracks-

Just before recording on the software of your choice, which for me was Cubase, I wrote each track out as what instrument they were so that it was organised and it was clear what each track was which made it easier for me to identify each of the tracks.

Overdubbing/listening for distortion-

I used the monitors to make sure there was no overdubbing or distortion. If I heard any of these I would use the mixing desk and to turn down the gain and levels to make sure the levels were balanced and there was no distortion or overdubbing of the track.

Overall evaluation-

Overall I believe the quality of each of the tracks was very successful because of the processes of pre-recording such as levels and sound checks, run throughs, rehearsals and stereo recordings which allowed me to achieve high quality tracks.

Log Sheets of recording sessions:


May 3rd- This was a 2hour session in the recording studios.  During this time we did many rehearsals and went over everyone's part so that when it came to recording, everyone knew exactly what they had to play and when.  This overall session was to run through and practice for the actual recording.

May 10th- This session was for 2 hours during which we completed the recording of the piano which is the backbone and structure of this project which I will record the track around.  

May 17th- During this 2 hour recording session, I recorded the acoustic guitar parts and the bass guitar parts.  This took 1 hour and a half.  For the last half an hour I ran through all the takes and chose the one that was the best. 

May 19th- In this 2 hour session, I recorded all of the vocals for the song and put the tracks together and structured and layered it to the correct time.  

May 24th- This was also a 2 hour session where I completed the mixing and mastering of the whole track.  This included adding effects such as: delay on the vocals and a slight gate.  Using a multi band and EQ I balanced out the whole song which produced a high standard.  I audio mixed it down into the MP3 file format.  I then finished the song. 


https://soundcloud.com/brandon-moss-course-work/unit-48-brief-3-sam-smith